注意:以下操作都在root用户下进行,输入命令sudo su,再输入password,强制进入root用户。

1.准备工具

1.1 安装docker

详见菜鸟教程docker安装
推荐使用官方安装脚本自动安装

curl -fsSL https://test.docker.com -o test-docker.sh
sudo sh test-docker.sh

测试docker是否安装完成,输入以下指令,出现如下信息即可。

$ sudo docker run hello-world
Unable to find image 'hello-world:latest' locally
latest: Pulling from library/hello-world
1b930d010525: Pull complete Digest: sha256:c3b4ada4687bbaa170745b3e4dd8ac3f194ca95b2d0518b417fb47e5879d9b5f
Status: Downloaded newer image for hello-world:latest


Hello from Docker!
This message shows that your installation appears to be working correctly.


To generate this message, Docker took the following steps:
\1. The Docker client contacted the Docker daemon.
\2. The Docker daemon pulled the "hello-world" image from the Docker Hub.
. (amd64)
\3. The Docker daemon created a new container from that image which runs the
executable that produces the output you are currently reading.
\4. The Docker daemon streamed that output to the Docker client, which sent it
to your terminal.


To try something more ambitious, you can run an Ubuntu container with:
$ docker run -it ubuntu bash


Share images, automate workflows, and more with a free Docker ID:
https://hub.docker.com/


For more examples and ideas, visit:
https://docs.docker.com/get-started/..

记得给docker换国内源,设置docker开机自启。

1.2 安装kubectl

Kubectl是控制 K8s的基本工具,输入以下命令安装:

curl -LO "https://dl.k8s.io/release/$(curl -L -s https://dl.k8s.io/release/stable.txt)/bin/linux/amd64/kubectl" && chmod +x kubectl && sudo mv kubectl /usr/local/bin/kubectl

#curl -O指获取链接文件,不更改文件名
#chmod +xm命令为文件增加执行权限
#mv命令将下载好的文件夹发送到指定目录下,这时系统已经可以检测到kubectl命令

输入kubectl version命令查看是否装好,如下图

微信图片_20231027111654.jpg

1.3 安装kind

kind工具在本机模拟单机k8s环境,输入以下命令安装,注意版本号:

curl -Lo kind https://kind.sigs.k8s.io/dl/v0.20.0/kind-linux-amd64 && chmod +x kind && sudo mv kind /usr/local/bin/kind

同样,输入kind version命令查看是否装好,如下图

微信图片_20231027111638.jpg

1.4 安装helm

helm工具可以理解为k8s的包管理工具,类似于python的pip,Ubuntu的apt,输入以下命令安装:

curl -LO https://get.helm.sh/helm-v3.8.2-linux-amd64.tar.gz && tar -zxvf helm-v3.8.2-linux-amd64.tar.gz && chmod +x linux-amd64/helm && sudo mv linux-amd64/helm /usr/local/bin/helm

输入helm version命令查看是否装好,如下图

微信图片_20231027111645.jpg

1.5 安装Tilt

tilt工具为k8s提供“一键部署”脚本,同时提供一个后台监控页面。输入以下命令安装:

curl -fsSL https://github.com/tilt-dev/tilt/releases/download/v0.30.0/tilt.0.30.0.linux.x86_64.tar.gz | tar -xzv tilt && sudo mv tilt /usr/local/bin/tilt

由于下载位于github,可能会比较慢,耐心等待,或者本机科学上网后,使用curl -x为curl设置代理。

输入tilt version命令查看是否装好,如下图

微信图片_20231027111651.jpg

2.拉取opentdf仓库

git clone https://github.com/opentdf/opentdf.git
cd opentdf/quickstart

如果git下载慢,则考虑本机下载文件夹,不使用git命令,或者,为git设置代理

一般情况下,本机实现了科学上网,但是git访问github还是很慢,因为git默认不走系统代理,需要手动设置。
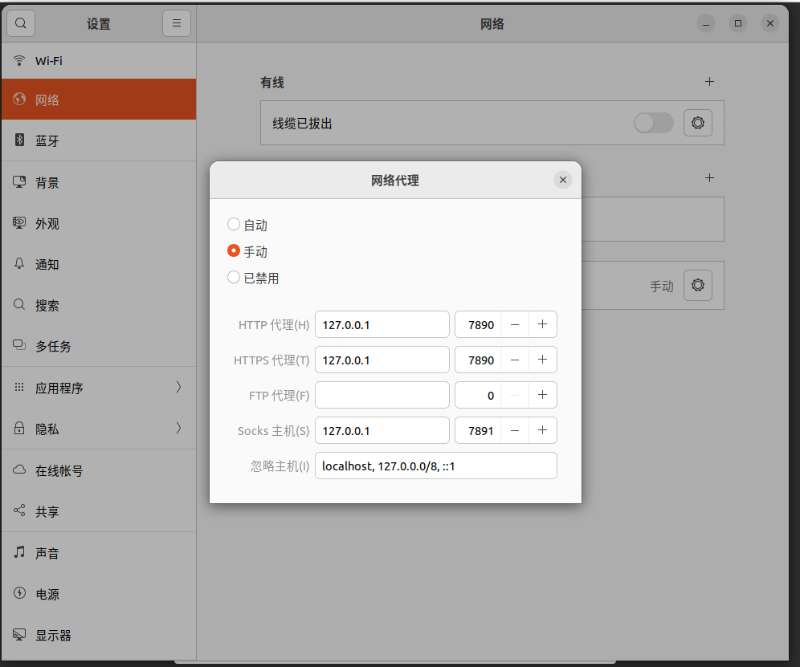
例如,本机开启科学上网,系统代理后,查看网络配置,IP:port127.0.0.1:7890,如图:

微信图片_20231027111952.jpg

用以下命令临时设置git代理

git config --global https.proxy http://127.0.0.1:7890
git config --global https.proxy https://127.0.0.1:7890

设置后用以下命令查看是否成功

git config --global --get http.proxy
git config --global --get https.proxy

用以下命令取消代理

git config --global --unset http.proxy
git config --global --unset https.proxy

3.登录ghcr.io

登录https://github.com/settings/tokens/new 页面勾选 write:packages 和 read:packages , repo 会自动选中,有效期选无限,创建 Token,并保存。

把你的TOKEN放到下面,然后登录,成功后显示 Login Succeeded

# Log in to GitHub Container Registry
# export CR_PAT=YOUR_TOKEN
export CR_PAT=ghp_unxxxxxxxxxxxxxxxxxxxxxxxxxxxxxx
echo $CR_PAT | docker login ghcr.io -u xxxxxx --password-stdin

4.创建集群

kind create cluster --name opentdf

第一次创建会比较慢,耐心等待。

5.修改配置脚本

由于网络和版本问题,还需要对Tiltfile等脚本文件进行修改。

查看opentdf/quickstart/Tiltfile文件,修改47行

helm_repo(
"bitnami-archive",
"https://raw.githubusercontent.com/bitnami/charts/archive-full-index/bitnami",
labels="utility",
)

#改为

helm_repo(
"bitnami-archive",
"https://codecentric.github.io/helm-charts",
labels="utility",
)

接着,在这里下载ingress-nginx-4.0.16.tgz,解压,记好该文件夹的路径,进入其文件夹,修改values.yaml文件19,20行,保存。

registry: k8s.gcr.io
image: ingress-nginx/controller

#改为

registry: registry.aliyuncs.com/google_containers
image: nginx-ingress-controller

重新修改quickstart目录下的Tiltfile文件,修改63行,将路径改为刚才ingress-nginx文件夹的路径

helm_resource(
"ingress-nginx",
"k8s-in/ingress-nginx",
flags=[
"--version",
"4.0.16",
"--set",
"controller.config.large-client-header-buffers=20 32k",
"--set",
"controller.admissionWebhooks.enabled=false",
],
labels="third-party",
port_forwards=("{}:80".format(INGRESS_HOST_PORT) if INGRESS_HOST_PORT else None),
resource_deps=["k8s-in"],
)

#改为

helm_resource(
"ingress-nginx",
"k8s-in/ingress-nginx",#从本地加载。改为自己的路径。chart文件
flags=[
"--version",
"4.0.16",
"--set",
"controller.config.large-client-header-buffers=20 32k",
"--set",
"controller.admissionWebhooks.enabled=false",
],
labels="third-party",
port_forwards=("{}:80".format(INGRESS_HOST_PORT) if INGRESS_HOST_PORT else None),
resource_deps=["k8s-in"],
)

6.启动

进到 quickstart目录下,运行 tilt up, 然后输入 t, 显示各个组件的状态。

微信图片_20231027120908.png

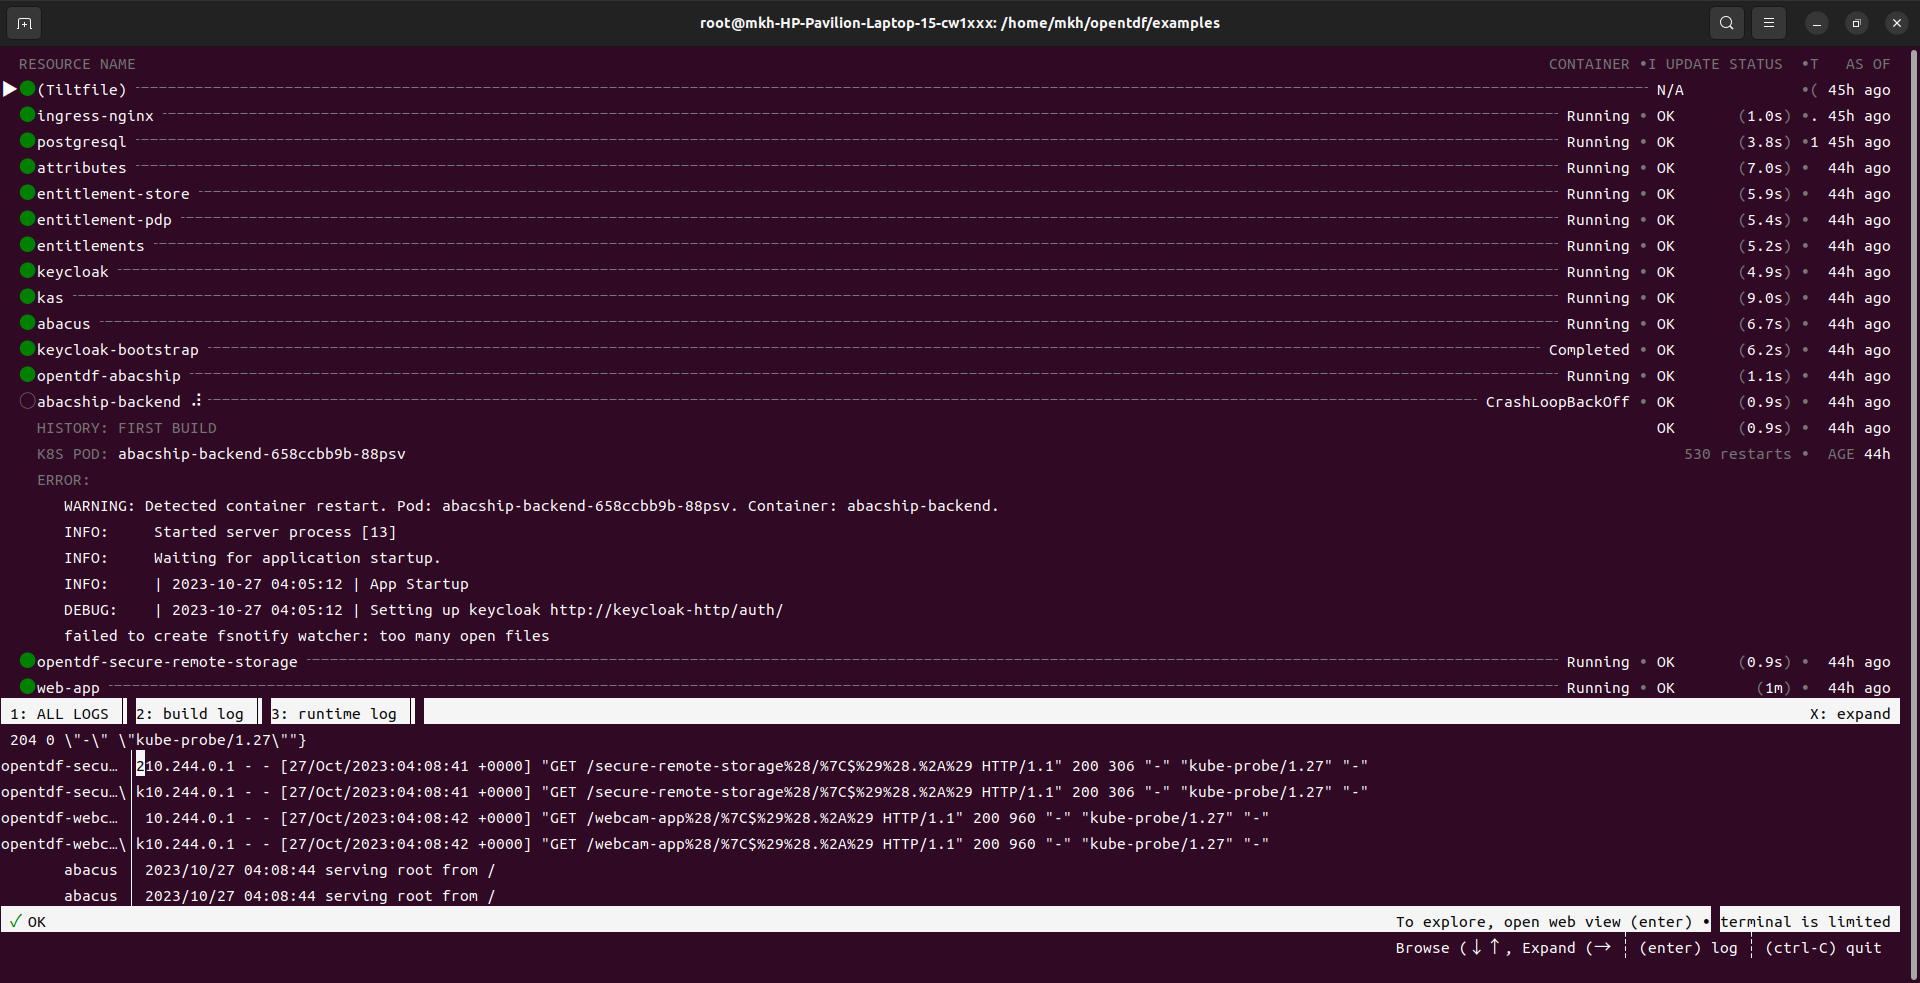
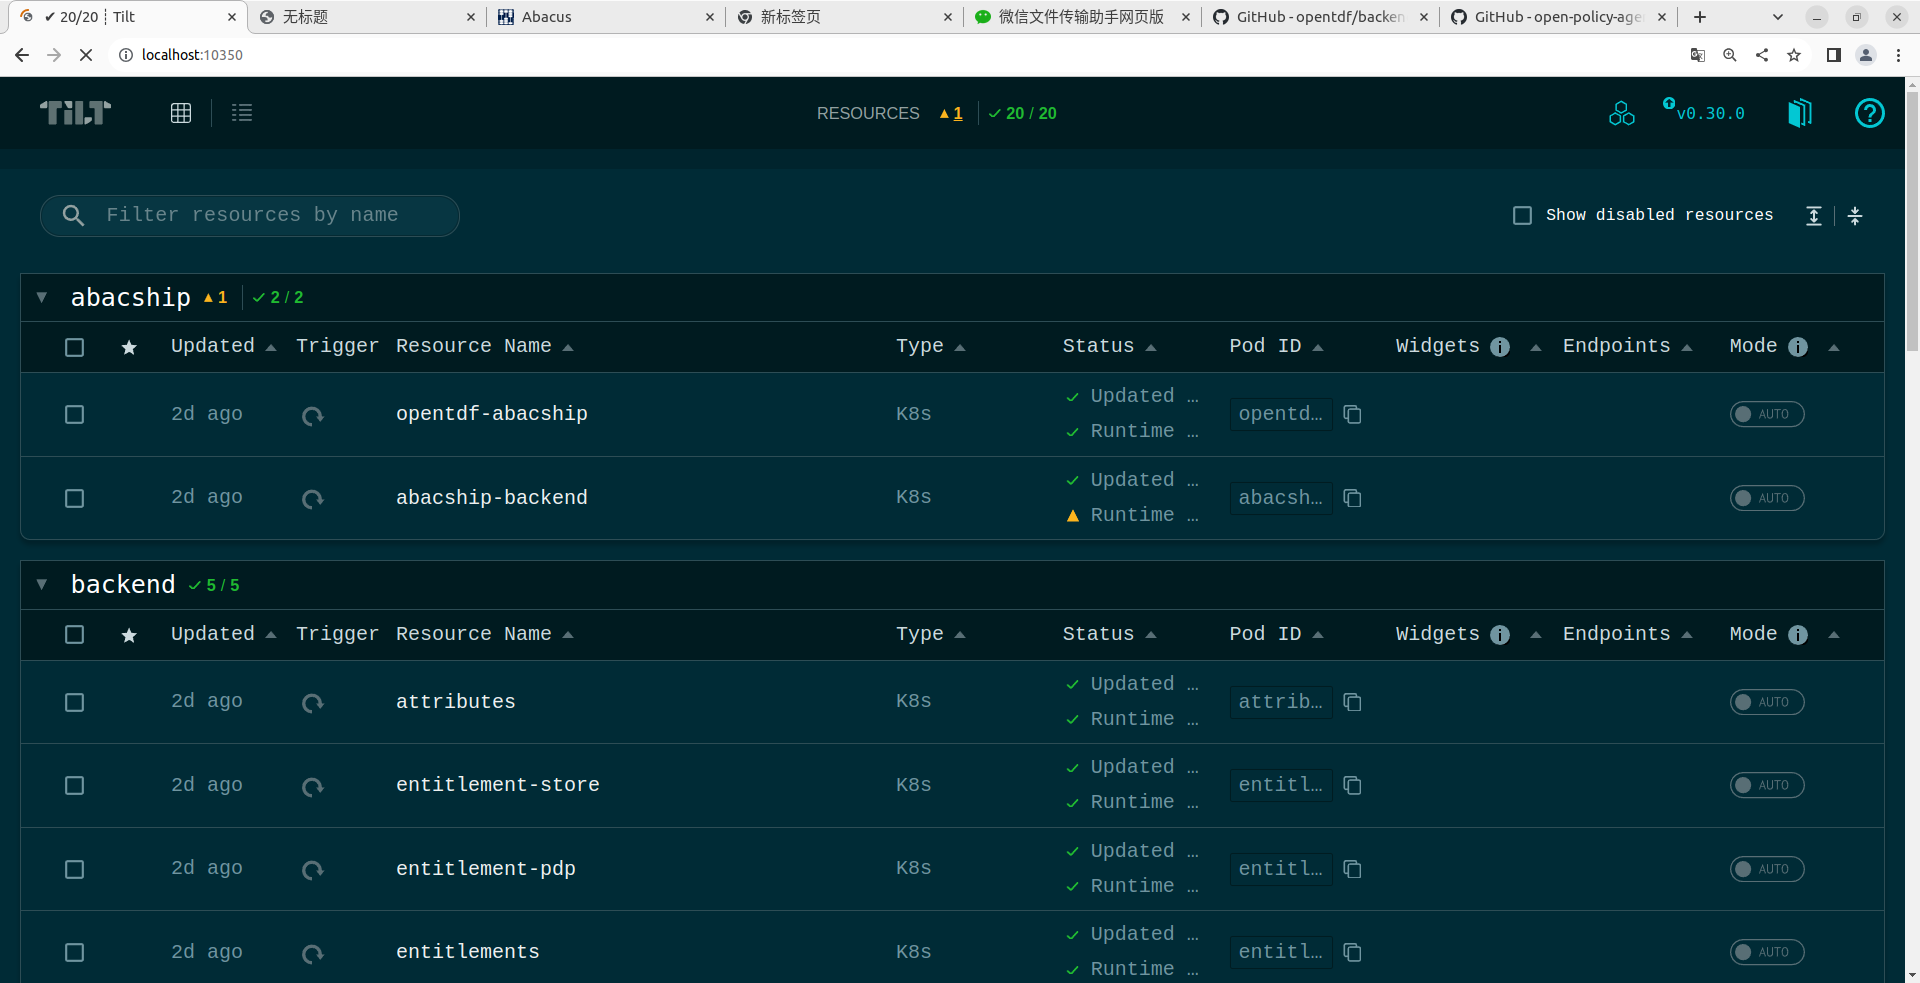
也可以通过http://localhost:10350端口查看各个组件的日志,进行重新启动的操作等等。

微信图片_20231027121037.png

第一次运行,需要pull image, 会比较耗时间,有可能失败,不要怕, Ctrl+c结束后, 继续 tilt up,重新运行就好。

登录abacus, 由于abacus只能用localhost访问,不能用IP访问,需要解决一下。

链接是如下:

http://localhost:65432/